Sunday evening, the kitchen counter is clean, the pen is beside an alcohol swab, and you're reading the label for the third time. That hesitation is normal. Semaglutide injection instructions are straightforward once you separate the decisions that matter, the correct product, the prescribed dose, the injection site, and the timing, from details that often create unnecessary confusion.
Semaglutide is designed for once-weekly subcutaneous use. FDA labeling for Ozempic specifies the same day each week, at any time of day, with or without meals, injected under the skin of the abdomen, thigh, or upper arm (FDA prescribing information). The practical method differs between a branded pen and a compounded vial, so never assume instructions for one device apply to another.
Your First Semaglutide Injection at Home
Your first dose should feel more like a short medication routine than a test of bravery. Put the pen, alcohol swab, and sharps container on a clean, flat surface. Wash your hands, confirm the prescribed dose, and choose the weekly time that you can repeat reliably.
Ozempic and Wegovy use prefilled injection pens. Compounded semaglutide may arrive in a vial with a syringe, depending on the dispensing pharmacy and prescription. The weekly schedule and clean technique remain important, but the way you measure the dose can be materially different. If you're unsure whether you have a pen or vial product, stop before drawing or dialing anything and contact the prescriber or pharmacy.
A counter-level checklist
- Clean your workspace: Clear a flat surface and keep pets, food, and loose items away.
- Wash your hands: Soap and water reduce contamination before you handle the needle.
- Gather supplies: Have an alcohol swab and an FDA-cleared sharps container within reach.
- Confirm the medicine: Check the medication name, prescribed strength, and expiration date.
- Choose the day and window: Semaglutide can be given at any time of day, with or without food (FDA prescribing information).
- Set a reminder: A recurring calendar alert or phone reminder makes the weekly routine easier to maintain.
The problems I see most often aren't dramatic technique failures. Patients miss the weekly dose, move through titration too quickly, or repeatedly puncture the same patch of skin. A consistent routine helps prevent all three.
For a practical overview of preparing for injections at home, see this guide to weight-loss injections at home. The next decisions are equally concrete: verify the pen and medication, choose a site that can be rotated, follow the prescribed dose escalation, and use the pen without rushing the delivery.
Preparing the Pen and the Medication
Take the pen from the refrigerator before dosing if your product instructions allow it, giving the medication time to come closer to room temperature. Cold injections can feel sharper. Don't heat the pen with hot water, a microwave, or a radiator.
Look through the pen window before attaching a needle. The solution should appear clear and colorless, without visible particles. Confirm the medication name, concentration, and expiration date. A cloudy appearance, unexpected color, particles, damaged packaging, or an unclear label is a reason to pause and contact the pharmacy.
Prepare a branded pen
- Wipe the rubber stopper at the pen tip with an alcohol swab and let it dry.
- Attach a new compatible needle, such as the type specified for your device. Screw it on securely without touching the needle.
- Remove both caps, placing the outer cap nearby for safe needle removal later.
- Perform a flow check only when the device label requires it. Pen designs and instructions aren't interchangeable.
- Dial the exact prescribed dose. Don't estimate clicks unless your clinician and the product instructions explicitly direct you to do so.
A fresh needle is required for every injection. Reusing one can make the tip less comfortable, damage the needle, and compromise safe handling. After the injection, never leave the needle attached to the pen.
Compounded medication requires a separate check. A vial may list a concentration in mg/mL, while the syringe shows volume markings. Those are not the same measurement. The FDA warning about compounded semaglutide dosing emphasizes the need to verify syringe size and how the prescribed dose is measured.
If your prescription involves reconstituting medication, don't use branded-pen instructions as a substitute. Review this guide to reconstituting semaglutide, then confirm the exact concentration and volume with your prescriber or dispensing pharmacy.
Choosing and Rotating Injection Sites
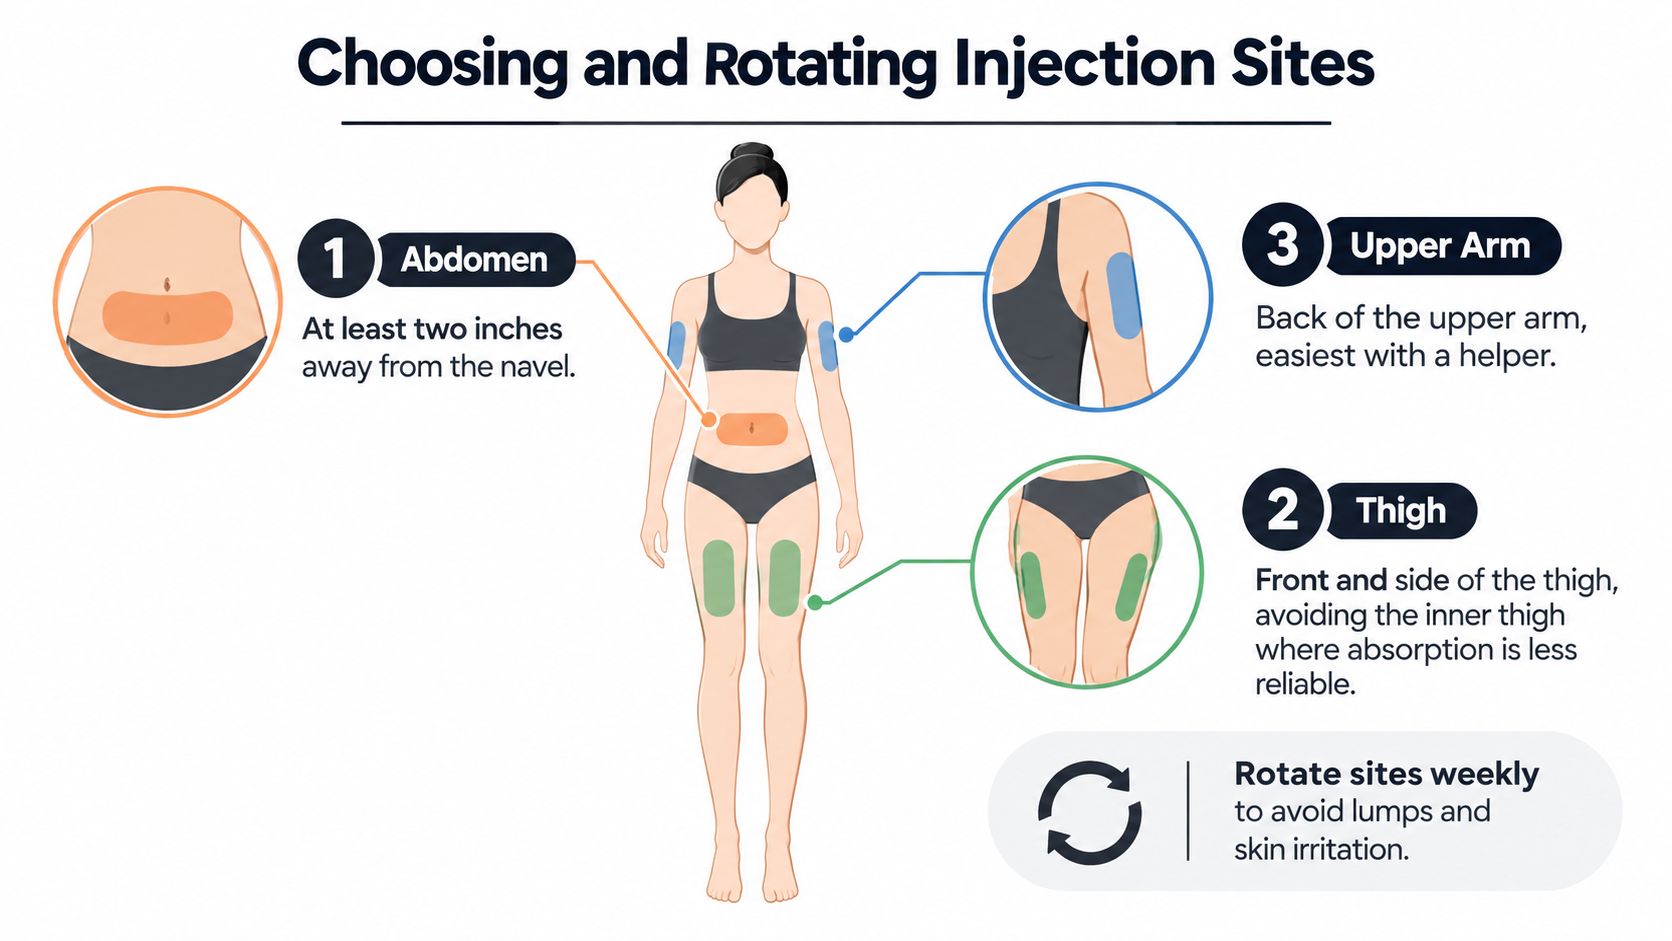
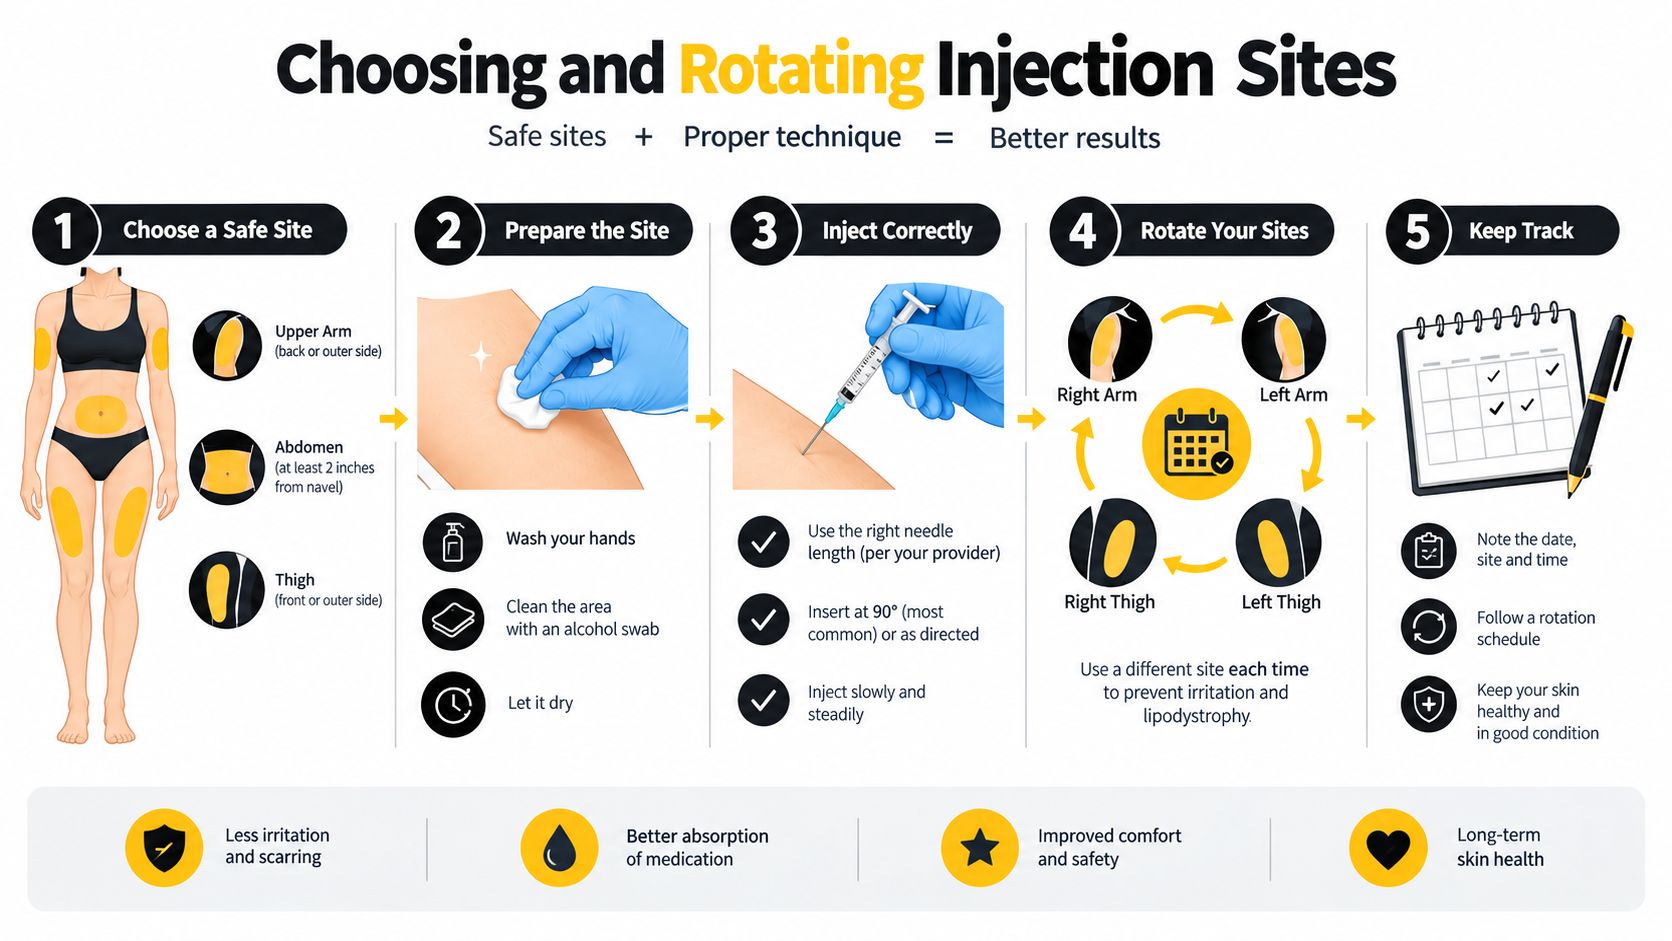
The approved subcutaneous areas are the abdomen, thigh, and upper arm. The abdomen should be at least two inches away from the navel. The thigh means the front or side of the thigh, not the inner thigh. The upper arm is usually easiest when another person can reach the back or outer portion safely.
Comfort should guide your choice, but repetition should not. Rotating sites reduces local irritation and helps you avoid injecting into tissue that has become firm, tender, bruised, or lumpy. FDA labeling identifies the abdomen, thigh, and upper arm as injection areas and advises rotating within the region (FDA prescribing information).
A simple rotation map
Use one site for the current week, then move to another region the following week. Within the same region, leave clear space from the previous puncture. You can use a simple pattern such as:
- Week one: Abdomen, right side.
- Week two: Front or side of the left thigh.
- Week three: Abdomen, left side.
- Week four: Upper arm with a helper, if appropriate.
- Week five: Abdomen, right side, away from the first puncture.
- Week six: Opposite thigh, away from the earlier site.
- Week seven: Abdomen, left side, using a new point.
- Week eight: Upper arm or another suitable area.
This isn't a requirement to abandon the abdomen permanently. It's a way to create enough distance between punctures so you don't automatically use the same comfortable spot every week. A site can be reused later if the skin looks and feels normal, but avoid any area with scars, stretch marks, moles, tattoos, bruising, redness, tenderness, or a rubbery thickened patch.
For more practical examples, use this injection-site rotation guide. If you notice a persistent lump or an area that feels different from the surrounding skin, choose another location and tell your clinician if it doesn't settle.
Weekly Dose Escalation Explained
Semaglutide treatment generally starts below the maintenance dose and increases gradually. For Wegovy, FDA clinical pharmacology materials describe a sequence of 0.25 mg, 0.5 mg, 1.0 mg, 1.7 mg, and 2.4 mg once weekly, with increases made in four-week stages (FDA Wegovy clinical pharmacology review).
The opening dose is a tolerability step, not a dose to accelerate past because appetite changes seem modest. Your prescriber may keep you at a stage longer when side effects interfere with eating, drinking, or daily activities. Never increase the dose early, skip a stage, or restart at a higher amount without medical direction.
| Stage | Weekly dose | Duration | Purpose |
|---|---|---|---|
| Starting stage | 0.25 mg | 4 weeks | Introduce treatment and assess tolerability |
| First increase | 0.5 mg | 4 weeks | Continue gradual adaptation |
| Middle increase | 1.0 mg | 4 weeks | Build toward the prescribed treatment dose |
| Advanced increase | 1.7 mg | 4 weeks | Continue titration before maintenance |
| Maintenance stage | 2.4 mg | Ongoing as prescribed | Maintain the treatment plan |
The exact pen presentation matters. Ozempic pens are labeled for specific dose options, while Wegovy uses a titrated pen lineup that reaches a 2.4 mg weekly maintenance dose in weight-management treatment (FDA prescribing information). Don't convert one product's clicks or pen strength into another product's dose.
Practical rule: The dose on your prescription, not the number of clicks you remember from a different pen, controls the injection.
Compounded semaglutide needs another layer of caution. The vial's concentration must be verified before you draw the dose. A volume that looks small or familiar may represent a different amount of medication when the concentration changes.
Giving the Injection Step by Step
Once the pen is prepared and the site is clean, slow down. Most preventable errors happen because the person is trying to finish before the medication has fully delivered.
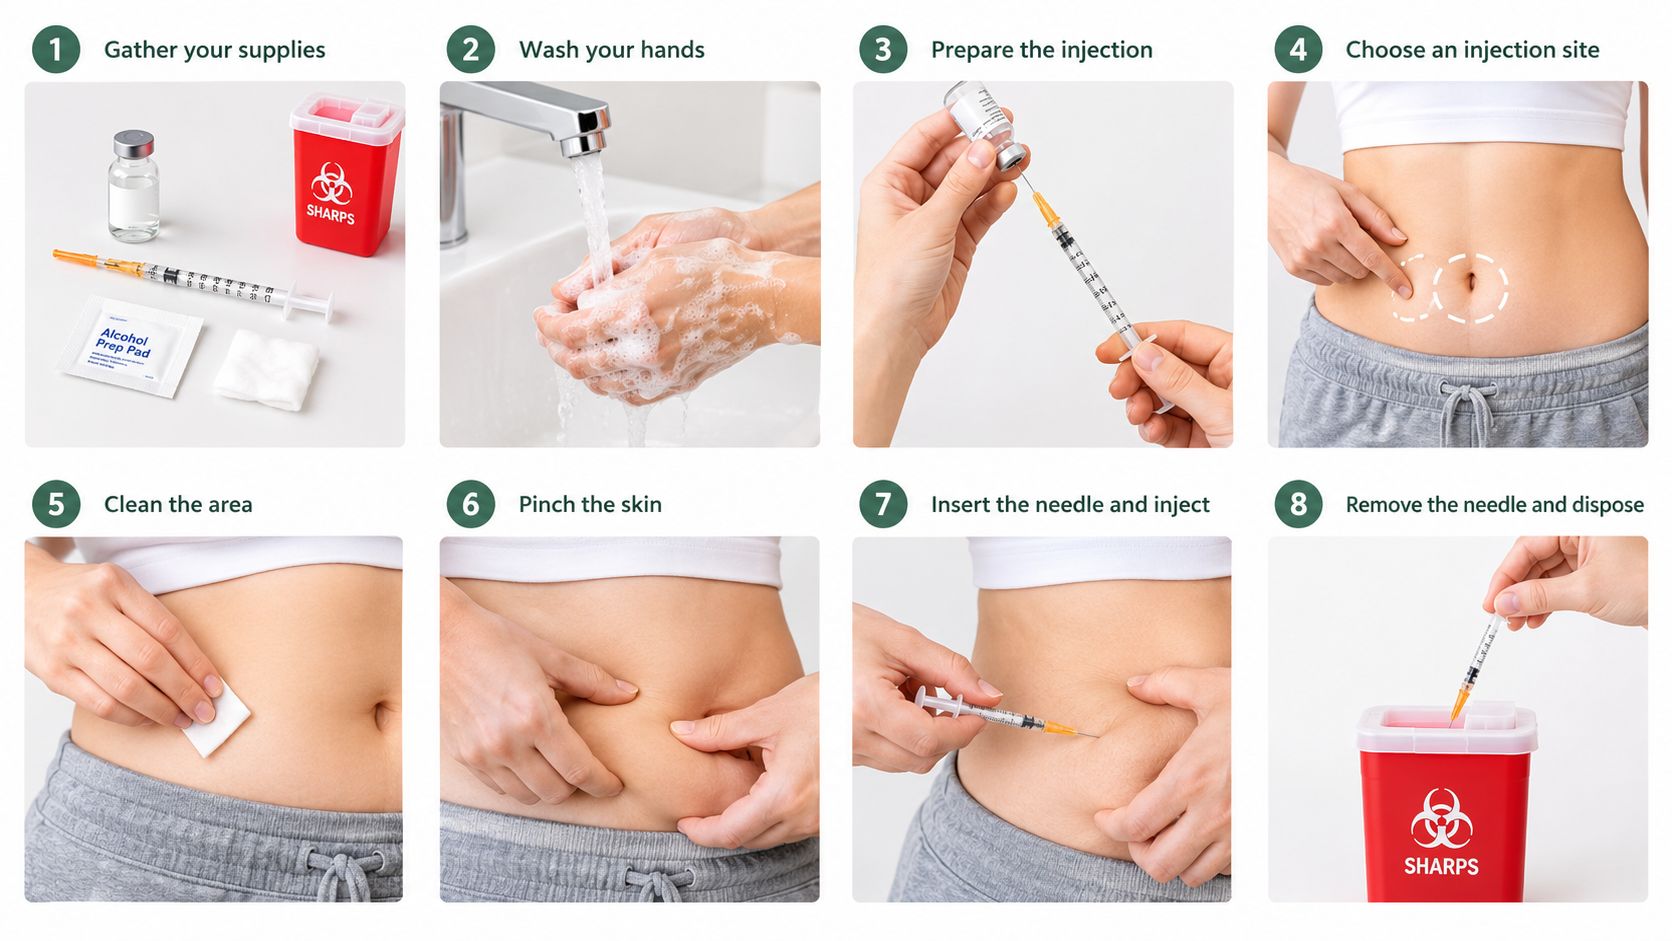
Wash your hands and clean the chosen skin with an alcohol pad. Let the area air-dry. Injecting through wet alcohol can sting, and rubbing the site afterward can irritate the puncture.
The injection sequence
- Expose clean skin. Don't inject through clothing.
- Lift the subcutaneous tissue if needed. A gentle pinch can help separate fatty tissue from muscle, especially when the skin is thin.
- Place the pen straight against the skin. Keep it at a 90-degree angle.
- Press the dose button firmly. The device may click as delivery begins.
- Keep the button depressed. Hold the pen in place for the period stated in your product instructions. If your device instructions specify a six-second hold, complete the full hold before lifting the pen.
- Remove the pen straight out. Don't drag it sideways across the skin.
- Check the dose indicator. It should show that the dose has been delivered according to the device instructions.
- Dispose of the needle safely. Use the outer cap to cover the used needle if directed, unscrew it, and place it immediately in the sharps container.
A tiny spot of blood can happen. Apply light pressure with clean gauze if needed, but don't massage the site. If the pen's indicator doesn't behave as expected, don't repeat the dose to compensate. Keep the pen, note what happened, and contact the pharmacy or prescriber for instructions.
Common Injection Mistakes to Avoid
A clean-looking setup doesn't guarantee a complete dose. At the kitchen counter, people commonly rush the hold, reuse a needle, choose a convenient bruise, or treat a vial like a pen. Each mistake has a different fix.
- Repeating one comfortable spot: Move around the approved regions and avoid firm or lumpy tissue.
- Using damaged skin: Skip bruises, scars, irritated areas, tattoos, and tender patches.
- Reusing needles: Start every injection with a new needle and discard it immediately afterward.
- Pulling away too soon: Keep the pen in place for the full hold specified by the device instructions.
- Guessing a compounded volume: Confirm the concentration in mg/mL and the syringe measurement before drawing.
- Mixing medications: Semaglutide and insulin should be separate injections, not mixed in the same syringe or pen (FDA labeling for compounded semaglutide).
- Doubling after a missed dose: Follow the product's missed-dose instructions rather than trying to catch up.
- Storing the pen carelessly: Protect it from excessive heat, freezing temperatures, and direct light, following the product label.
The compounded-product risk deserves special attention. The FDA has warned about dosing errors involving compounded semaglutide, including confusion around syringe size and dose measurement (FDA safety communication). Branded pens reduce the need to translate milligrams into syringe volume, while compounded vials require you to make that translation correctly every time.
Before drawing a compounded dose, ask: “What concentration is this vial, what volume matches my prescribed milligram dose, and which syringe marking should I use?”
The FDA announced that the semaglutide shortage was resolved in February 2025, and later policy changes affected compounders as supply stabilized (STAT coverage of the shortage resolution). That doesn't make every compounded product interchangeable with Ozempic or Wegovy. Read the label in front of you, verify the pharmacy's instructions, and ask before substituting a vial for a pen.
Storage, Missed Doses, and When to Call
Storage mistakes are easy to make because the pen looks like an ordinary household item. Keep it according to its own prescribing information, protect it from light, and never freeze it or expose it to damaging heat. Before first use and after opening, the permitted storage conditions and in-use period depend on the specific product, so use the label supplied with your pen rather than applying a rule from another semaglutide brand.
Missed-dose instructions also depend on the product. For Ozempic, the FDA label says a missed dose may be taken within 5 days. If more than five days have passed, skip it and return to the regular weekly schedule (FDA Ozempic prescribing information). Don't take extra semaglutide to compensate.
Dispose of sharps correctly
Put used needles directly into an FDA-cleared sharps container. Don't place them in household recycling, leave them loose in a trash bag, or save them for later. When the container reaches its fill line, follow your local disposal instructions or the guidance supplied by your pharmacy.
Contact your prescriber promptly if you have persistent vomiting that makes hydration difficult, spreading redness or a suspected abscess at the injection site, a suspected pregnancy, severe abdominal pain, or signs of an allergic reaction. Severe abdominal pain needs medical assessment because it can signal a serious complication.
Your clinician should handle dose changes, illness-related medication decisions, and combinations with insulin or other diabetes medicines. If weight loss is part of your treatment, nutrition, resistance exercise, and strategies to preserve muscle on GLP-1 medications also deserve attention. The injection is one part of a monitored plan, not a reason to self-adjust medication.
If you want prescription-based support with weekly semaglutide injections, dose adjustments, and questions between doses, Weight Method connects eligible adults with licensed providers through telehealth and coordinates medication delivery through its care process. Visit the site to complete the online intake and discuss whether supervised GLP-1 treatment fits your health needs.